To shorten your pants without going to the seamstress, you just need a needle and a meter.
Take the measurements, fold and sew the hem with hidden dots for a perfect result and save time and money.
You don’t have to be a sewing expert or turn to a seamstress to shorten your pants.
With a simple needle and a seamstress metre, you can get a perfect result directly at home, saving you time and money. Here’s how to do step by step.
1. Needed to shorten the pants
- A needle and thread of the right color.
- A seamstress yardstick.
- Scissors for fabric.
- Tains or chalk of a seamstress.
- Iron iron.
2. How to take the perfect measurements
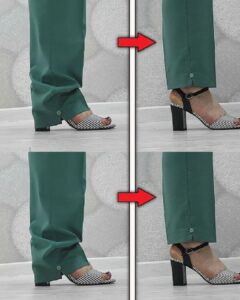
- Wear your pants with shoes that you’ll usually use.
- With the help of a mirror or another person, bend the hem to the desired length.
- Fix the hem with pins or mark the line with a seamstress chalk.
- Remove the pants and use the meter to make sure that both hems are the same height.
3. Prepare the Hem Before Sewing
- Remove the original hem by cutting the excess of fabric, leaving about 3-4 cm for the new hem.
- Fold the edge inward and iron with the iron to fix the crease.
- If necessary, use pins to keep the hem steady during the seam.
4. Simple and durable hand stitching
- Thread the needle with the thread of the same color as the trousers.
- Perform small hidden spots, passing the needle only through the inner tissue of the hem for a clean result.
- Continue all along the hem while keeping the regular points.
- Once finished, knot the thread and cut the excess.
5. The perfect finish
- It will again iron the brim to flatten any creases.
- Check that both sides have the same length.
With this simple method you can shorten your pants at home without having to resort to a seamstress. A needle, a meter and a bit of patience are enough to get a clean and professional result.